
티스토리 뷰
▤ ansible-server / node{1..3} 까지 ip 제대로 안잡히고, provision 을 못읽는다
vagrant plugin uninstall vagrant-vbguest# 이전에 vagrant 에 다운로드한 plugin 이 현재 사용하는 버전에서는
# 삭제하지 않으면 kernel-header 설치에러 뜨면서 진행이 멈추거나
### 그래서 node 마다 계속 설치해야한다
# ip 설정이 안되는 현상이 발생한다
▶ fingerprints 를 직접 node1 로 하는 것이 아니라
>> 바로 수집하게 하는 법
[vagrant@control ~]$ ssh-keyscan node1 >> ~/.ssh/known_hosts
# node1:22 SSH-2.0-OpenSSH_7.4
# node1:22 SSH-2.0-OpenSSH_7.4
# node1:22 SSH-2.0-OpenSSH_7.4
[vagrant@control ~]$ ssh node1
Warning: Permanently added the ECDSA host key for IP address '192.168.110.20' to the list of known hosts.
vagrant@node1's password:
▶ Vagrantfile 의 내용에 있기 때문에
>> ansible_env_ready.yml 파일이 존재한다
cfg.vm.provision "file",source:"ansible_env_ready.yml",
			destination: "ansible_env_ready.yml"
[vagrant@control ~]$ ls
ansible_env_ready.yml
playbook 을 활용하여 공개키 복사
▶ 공개키 수집
>> become: yes + become_user: vagrant == sudo -u vagrant
>> with_items == loop
    - name: add "/etc/ansible/hosts"
      blockinfile:
        path: /etc/ansible/hosts
        block: |
            [centos]
            node1
            node2
            node3
            [ubuntu]
            node4
            node5
            [linux]
            node[1:5]
    - become: yes
      become_user: vagrant
      #sudo -u vagrant
      shell: "{{item}}"
      #loop
      with_items:
        - "ssh-keyscan 192.168.110.20 >> ~/.ssh/known_hosts"
        - "ssh-keyscan 192.168.110.30 >> ~/.ssh/known_hosts"
        - "ssh-keyscan 192.168.110.40 >> ~/.ssh/known_hosts"
        - "ssh-keyscan 192.168.110.50 >> ~/.ssh/known_hosts"
        - "ssh-keyscan 192.168.110.60 >> ~/.ssh/known_hosts"
▶ [nodes:children] >> /etc/ansible/hosts
▷ children 은 아래쪽에 있는 것들이 그룹임을 의미
>> centos 와 ubuntu 라는 node 가 있어도
>> 그룹 centos 와 ubuntu 로 인식한다
[centos]
node1
node2
node3
[ubuntu]
node4
node5
[linux]
node[1:5]
[nodes:children]
centos
ubuntu
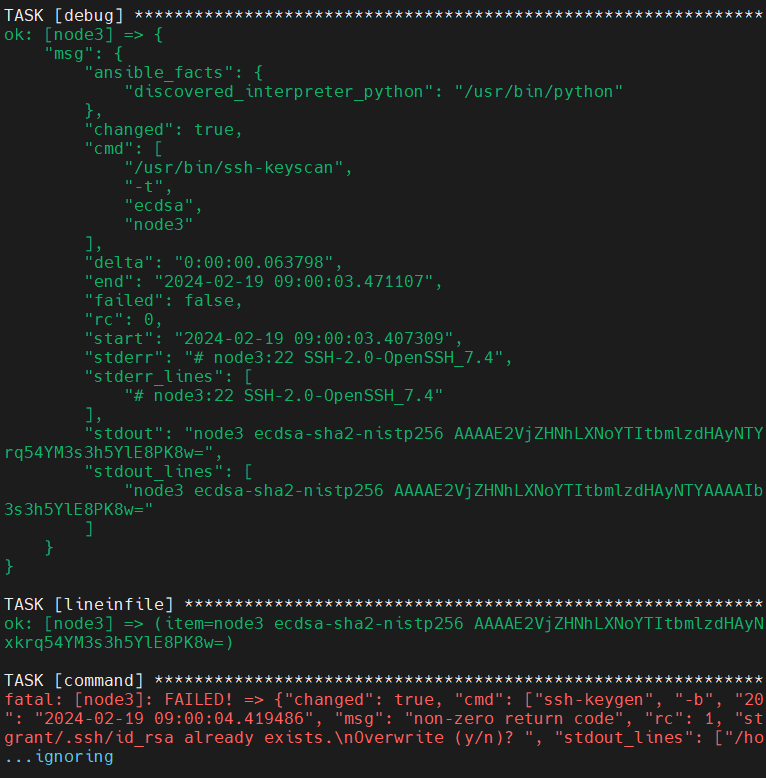
▶known_hosts 자동 등록
▷ stdout 은 node 이름이 나오는 것을 확인
- hosts: all
#  connection: local
  tasks:
    - command: hostname
      register: command_result
    - debug:
        msg: "{{command_result}}"
▷ connection 은 키워드 / 모듈이 아니다
>> hosts 들에 모두 실행이 되는데
>> hosts 들이 아닌 local 에서 명령어를 실행하라
>> stdout 은 표준 출력
- hosts: all
  connection: local
  tasks:
    - command: hostname
      register: command_result
    - debug:
        msg: "{{command_result}}"
▷ {{ansible_host}} , {{inventory_host}} 변수는 fact 변수가 아니다
>> gather_facts: no
>> 매직 변수임을 뜻한다 >> ansible 자체에서 쓸 수있는 변수
- hosts: all
  gather_facts: no
  tasks:
    - debug:
        msg: "{{ansible_host}}"
    - debug:
    	msg: "{{inventory_hostname}}"
▷ 하나의 모듈을 5대에 다 보내서 한번에 처리한다
>> 따라서 10초가 걸린다
>>> 한대에 모듈을 보내서 해당 장비만 끝났다고 해서 다음 커맨드를 보내는게 아니라
>>> 모든 장비가 완료되었을 때에 모듈을 보내서 처리한다
- hosts: all
  gatehr_facts: no
  tasks:
    - debug:
        msg: messages 1
    - command: sleep 5
    - debug:
        msg: messages 2
    - debug:
        msg: messages 3
    - command: sleep 5
    - debug:
        msg: finished playbook
▷ fork=2 는 모듈을 2대의 장비에게 보내고
>> 2대가 끝나면 다음 2대에 모듈을 보낸다
>>> 15초가 걸려야 끝난다
## default 는 fork=5 이다 >> 장비가 많으면 늘리는게 좋다
ansible-playbook c.yml --fork=2 -k
▷ serial=2 (직렬)
>> serial=2 는 한번에 다 끝내고 다음 모듈진행이 아니라
>>> 2대에 모듈을 보내서 장비가 모든 모듈을 끝내고나서
>>> 다음 2대에 모든 모듈 처리
>>>> 시간이 굉장히 오래걸린다 50초가 걸린다
- hosts: all
  serial: 2
  gather_facts: no
  tasks:
    - debug:
        msg: messages 1
    - command: sleep 5
    - debug:
        msg: messages 2
    - debug:
        msg: messages 3
    - command: sleep 5
    - debug:
        msg: finished playbook
▷ stdout 가 stdout_lines 는 타입이 다르다
▷ stdout 은 문자열이다
▷ stdout_lines 리스트 타입으로 되어있다
○ ansible_host 는 inventory에 저장되어 있는 변수이므로
>> node1.example.com 이 아닌 node1 로 나온다
>> serial: 1 + run_once 를 동시 사용하여, 안정성을 높였다
- hosts: nodes
  connection: local
  serial: 1
  gather_facts: no
  tasks:
    - command: /usr/bin/ssh-keyscan -t ecdsa {{ansible_host}}
      register: keyscan
    - debug:
        msg: "{{keyscan}}"

    - lineinfile:
        path: ~/.ssh/known_hosts
        line: "{{item}}"
        create: yes
      with_items:
       - "{{keyscan.stdout_lines}}"
▷ keyscan.stdout 으로 실행하면 값이 known_hosts 에 저장이 안된다

▷ 192.168.110.20 / node1 둘다 접속됨을 확인

▶ 비대화식 키 생성
▷ passphrase 안넣으려면 ' '
ssh-keygen -b 2048 -t rsa -f ~/.ssh/id_rsa -q -N ''
▷ run_once 는 한번만 실행
- hosts: all
  tasks:
    - debug:
        msg: ansible
    - debug:
        msg: devops
      run_once: true
▷ 1번씩 실행
- hosts: all
  serial: 1
  tasks:
    - debug:
        msg: ansible
    - debug:
        msg: devops
      run_once: true
◎ authorized_keys 는 윈도우가 보는 키이므로 제외하고 나머지는 모두 삭제하고 작업 진행
>> vagrant up 을 할 때에 윈도우에서 만들어진 key
[vagrant@control ~]$ ls .ssh
authorized_keys  id_rsa  id_rsa.pub  known_hosts
● vars : ansible_password: vagrant 는 자동으로 입력되도록 해준다
● authorized_key 모듈은 파일 ~/.ssh/id_rsa.pub 를 찾아서 authorized_key로 각 node에 만들어 준다
>> 즉 ~/.ssh/id_rsa.pub 와 authorized_key 는 같은 내용이다
● usr/bin/ssh-keyscan -t ecdsa [호스트명 / ip 주소] : SSH 호스트의 공개키를 검색하는데 사용한다
[ -t 는 사용할 암호화 알고리즘을 의미하며 / ECDSA 알고리즘을 사용한다는 것을 의미 ]
● -b : 비트 길이 지정, 기본값은 2048비트 ( 높을수록 안전 )
● -t : 사용할 키 타입 지정(암호화 방식) ( 여기서는 RSA 사용 )
● -f : key 생성할 위치 지정
● -q: 조용히 실행
● -N: 비밀번호 지정 ( ' ' 빈 문자열을 사용하여 비밀번호 설정 안함)
- hosts: nodes
  connection: local
  serial: 1
  gather_facts: no
  vars:
    ansible_password: vagrant
  tasks:
    - command: /usr/bin/ssh-keyscan -t ecdsa {{ansible_host}}
      register: keyscan
    - debug:
        msg: "{{keyscan}}"

    - lineinfile:
        path: ~/.ssh/known_hosts
        line: "{{item}}"
        create: yes
      with_items:
       - "{{keyscan.stdout_lines}}"

    - command: "ssh-keygen -b 2048 -t rsa -f ~/.ssh/id_rsa -q -N ''"
      ignore_errors: yes
      run_once: true

    - connection: ssh
      authorized_key:
        user: vagrant
        state: present
        key: "{{lookup('file', '~/.ssh/id_rsa.pub')}}"
> AUTHORIZED_KEY
(/usr/lib/python2.7/site-packages/ansible/modules/system/authorized_key.py)

        Adds or removes SSH authorized keys for particular user accounts.

 = key
        The SSH public key(s), as a string or (since Ansible 1.9) url
        (https://github.com/username.keys).

        type: str
= user
        The username on the remote host whose authorized_keys file will be
        modified.

		type: str

EXAMPLES:

- name: Set authorized key taken from file
authorized_key:
  user: charlie
  state: present
  key: "{{ lookup('file', '/home/charlie/.ssh/id_rsa.pub') }}"

    - name: Set authorized keys taken from url
authorized_key:
  user: charlie
    state: present
    key: https://github.com/charlie.keys

- name: Set authorized key in alternate location
authorized_key:
  user: charlie
    state: present
    key: "{{ lookup('file', '/home/charlie/.ssh/id_rsa.pub') }}"
    path: /etc/ssh/authorized_keys/charlie
    manage_dir: False
▤ default 가 python 인데 ubuntu node4 에서는 python3으로 되어있어서 생긴 에러

▷ 이렇게 해도 안된다
[centos]
node1
node2
node3
[ubuntu]
node4
node5

[ubuntu:vars]
ansible_python_interpreter=/usr/bin/python3
[linux]
node[1:5]
[nodes:children]
ubuntu
centos
▷ 직접 node 4 와 node 5에서 심볼릭링크를 걸어준다
>> python 이 없어도 /usr/bin/python이 존재한다
vagrant@node5:~$ sudo ln -s /usr/bin/python3 /usr/bin/python
vagrant@node5:~$ readlink -f /usr/bin/python
>> 밑의 오류는 이미 공개키 기본키가 만들어져 있어서 생기는 에러일 뿐
>> ignore_errors: yes 라서 넘어가진다
'Ansible' 카테고리의 다른 글
| Ansible playbook 의 암호화 (0) | 2024.02.20 |
|---|---|
| 매직변수 (0) | 2024.02.19 |
| vagrant 백업 및 삭제 (0) | 2024.02.19 |
| windows nginx 실행 안된다 (0) | 2024.02.19 |
| Ansible 총정리2 (0) | 2024.02.16 |